

Today we will explore moving motors with MatLab, and you will begin to move the robot across the floor.
Download the Word document "E5Matlab3.doc" and save it to your user folder or to SwatFiles (right click on the link and choose Save File As...) There are several questions in this lab. Fill in the answers (some will consist of cut-and-pasted MatLab code and plots) on the Word document. Each student is to post the revised document on her/his website before Fall Break.
*Important* Be sure to use your user folder or SwatFiles and not the hard drive on the computer you are using. ITS regularly wipes all of the data from local hard drives.
If you find that you would like extra help, the following resources are available (in no particular order):
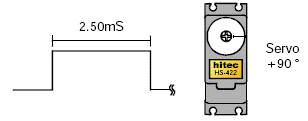
We will use servo motors to position the arms of the robot arm you will be building. Recall from class that the width of pulses sent to the servo determines the angle of the output shaft.
To control the servo motors we must first open a single serial port. You can use the following code (type directly into the Matlab prompt, without the comments):
s=instrfind; %Find any serial links (we can have only 1)
delete(s); %... and delete.
%Create a new serial communications link
s=serial('COM1','Baudrate',38400,'Terminator','CR');
fopen(s); %... and open it
The string of characters follow the format shown below:
#<ch>P<pw>...#<ch>P<pw>T<time>
where
So if we send the string:
then ch=1, pw=900, time=300. This will set the pulsewidth on motor 1 to 900 microseconds, and will make the change over 300 milliseconds. (900 ms ≈ -45°)
Likewise, if we can control multiple motors simultaneously
#1P1200#5P2100T1500
This will set the pulsewidth on motor 1 to 900 microseconds, the pulsewidth on motor 5 to 2100 microseconds, and will make the change over 1500 milliseconds.
The only piece missing is how to send the string to the I/O board. If we have already created the serial link (as described above), we can send a string with the MatLab code:
% set pulsewidth on motor 1 to 1000 microseconds (over 200 mS)
fprintf(s,‘#1P1000T200');
So far we have only used MatLab to manipulate numbers, but it can also manipulate strings. Try entering the following, one line at a time (you needn't add the comments). If you have any questions about what is happening, please ask.
% Anything between two single quotes is a string.
a = 'this'
b = ' '
c = 'is'
d = 'ain''t'   		%Adding single quotes

x=a

x = [a b c b a]		%combining strings

x = [a b c b a '!  ' a b d ' something else.']

disp(x)			%displaying strings

ch=1;  pw=900;  T=300;
num2str(pw)		%convert a number to a string
cmd = ['#' num2str(ch) 'P' num2str(pw) 'T' num2str(300)]

pw=900.35
cmd = ['#' num2str(ch) 'P' num2str(round(pw)) 'T' num2str(300)]
Your first task for today is to calibrate your three servos.
Connect servo "1" to channel 1 as shown below:

Note that the yellow wire is connected to the line labeled "pulse", the red wire to the line labeled "VS1" and the black wire to the one with the ground symbol. Do the same for the other two servos, using channels 2 and 3 on the Lynxmotion controller.
Download and run the script "ServoCalibrate.m" which asks for user input for the pulse width (in microseconds) and then sends the specified pulse width to channel 1.
Make sure you understand how the code works. In particular add comments to every line of uncommented code below the point marked in the code (i.e., for every line from line 12 (pw=1500) to the end of the script).
→ Do problem 1 of the Word document. ←
Set the pulse width to 1500 microseconds, and make whatever changes are required in this number to bring the first robot arm section straight forward; call this angle 0 degrees. Use the protractor to fill in the table below with the angles and several pulse widths. You may take more data at more pulse widths if you wish.
| Pulse width (microseconds) | |||||
| Angle (degrees) | 0 | -90 | -75 | +75 | +90 |
Now plot the pulse width versus angle using the Matlab plot command, and find the values of slope and intercept of the best-fit straight line to the data using the polyfit command (type "help polyfit" or "doc polyfit" to the Matlab prompt).
→ Do problem 2 of the Word document. ←
Repeat for the other two servos (the three motors may be different, so keep the data separate).
→ Do problem 3 of the Word document. ←
Use the supplied template, gotoAngles.m, and fill it in to create a function that takes as input:
The function should move the two motors, motor 1 and motor 2, to the desired angles. We will save calculating the position of motor 3 (to which the end affector is connected) until after Fall Break.
→ Do problem 4 of the Word document. ←
Use the supplied template, invKin.m, and fill it in to create a function that takes as input:
and returns
You may want to review the class notes to review the geometry of the problem.
Provide evidence that your invKin function works. To do this you should figure out at least three x, y, and z values and their associated values for theta and phi for a given arm length rho, and demonstrate that your function returns the proper angle.
→ Do problems 5 and 6 of the Word document. ←
The word document is to be posted on your website before Fall Break .
You should consider the tasks
in the Word document to be only a part of what you need to accomplish this week. Try issuing commands that make the robot arm contact the floor and pull itself forward, then raise up to the original position.
After break we will explore how to optimize this motion to drive the robot forward efficiently.